The ability to really focus on tasks in Todoist isn’t limited to Project or Labels views. Initially, new users spend their time working in Projects and then slowly start adding Labels to the mix, allowing themselves to work with Labels as a trigger. Once you’ve become a seasoned user, you realize that switching back and forth between projects and labels can disrupt your workflow, so you finally open up that tab you’ve been avoiding: Filters.
Todoist offers a primer on Filters, but I’ve found that that primer is merely a stepping stone to what you can do with them in a real-time user scenario. Filters in Todoist can really allow you to hone in and focus on tasks in a way that neither the Project or Labels View can, and in this post I’m going to offer 5 ways that you can get the most of filters in Todoist.
1. Don’t use too many filters
I tend to use David Allen’s adage about inboxes when it comes to filters: have as many as you need but as few as possible.
With any task management app, you don’t need to concern yourself with how many projects you have, but the number of contexts (which are basically Labels in Todoist) should be limited because they should represent things that will be around far longer than projects. That’s why locations, people, apps, energy levels, and so on make for good contexts/labels.
Filters should be just as limited, if not even more so. You don’t want to think about what filter you should be spending time in too often. Instead, you should be paying attention to how you’re working in Todoist when you were using it without filters to figure out what labels matter most to you. Then, use those labels as the key identifiers when building filters so that you can really hone in on what you should be working on at any given time.
2. Don’t make your filters too complicated
In a lot of cases, I’m not a fan of filters. Especially in Gmail.
Why?
Because filters can break…more so if they are too complex. That thought process has affected my use of filters in Todoist, and that’s why I try to keep my filter search queries to no more than two components.
That’s not difficult to do and get great filter options because you cannot use projects in your search queries for filters. (Updated on 12/18/14: Thanks to one of our readers, Steve, for pointing out that this has changed since this post was originally published. You can now use “p:ProjectName” (without the quotes) as a search term.) That means you’re limited to dates and labels, which isn’t a bad thing if you’re using labels in a way that benefits your workflow and you’re using due dates regularly. Actually, by default there’s a filter that lists every task that doesn’t have a date assigned to it, so that may be a great place to start after you’re done reading this piece as you can start assigning due dates (or dates in general) to those tasks.
The filters I use are simple and help direct my work with as little friction as possible. The ones I’m using most are as follows (Note: The query formulas are in parentheses):
- High Energy Tasks – Today (@high & tod)
- High Energy Tasks – Overdue (@high & od)
- High Energy Tasks – 5 Days (@high & 5 days)
- Normal Energy Tasks – Today (@normal & tod)
- Normal Energy Tasks – Overdue (@normal & od)
- Normal Energy Tasks – 5 Days (@normal & 5 days)
- Low Energy Tasks – Today (@low & tod)
- Low Energy Tasks – Overdue (@low & od)
- Low Energy Tasks – 5 Days (@low & 5 days)
I find that these filters are all I really need to move things forward on a daily basis, and I actually spend most of my time in the ones that have the “5 Days” component because they contain the day’s tasks along with ones for the rest of the work week.
You may want to exclude some of these queries from your choice of filters, or even add additional labels to them (i.e. Low Energy Emails – 5 Days would be “@low & @email & 5 days”). The key is to think about what filters will help you with your productivity most and then create those.
(Note: Unlike projects and labels, you will not see how many tasks are in each filter. So make sure you’re using labels that you’re using frequently when creating filters so that you can really reap the benefits of this feature.)
3. Make filters your starting point
Once you’ve set up your filters, it’s critical to make them your starting point when you open Todoist. The default Today and Next 7 Days viewpoints are designed for the masses, but your filters are what you create so they are tailor-made for your own workflow needs.
If you’re using Chrome or Safari, simply point your browser to whatever filter you want to use as your primary starting point. Then bookmark it, preferably placing it in your bookmarks bar, and then whenever you click on it you will get the desired filter as your starting Todoist screen. You can also pick that view as one of your starting tabs in either browser just by going into your browser’s settings (which will vary) and making the URL of that filter one of the starting tabs.
Since filters are really just search queries, you can also use them as your starting view in the standalone Todoist app. Just click on the gear in the upper right corner of the Todoist app, select Todoist Settings, and then in the General tab change the Start Page to Custom Query (as seen in the image below).
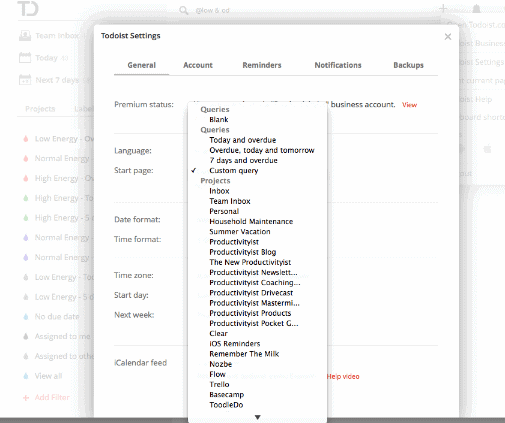
Then copy the URL of your desired starting page (in this case, a desired filter view) and paste it into the dialog box. After that, the starting page when you open the standalone app will be that custom query you’ve entered.
4. Colour code your filters
You can change the colour of a filter either during the filter creation process or by editing the filter and then clicking on the drip icon next to the name of the filter. A pop-up will reveal itself, offering you a selection of colours to choose from that you can assign to that filter. You can see how I’ve done this in the image below.
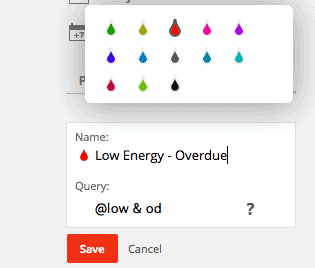
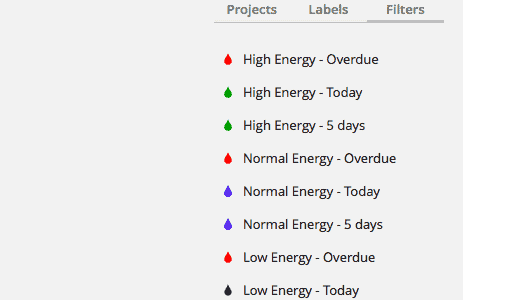
For the most part, I’ve marked all of my filters to match my labels. But one of the things I’ve made sure to do is mark any filters that have the “Overdue” element with the colour red, which gives them a greater sense of urgency. I’m not a fan of using red for tasks unless they are urgent, and I’ve avoided using it in my projects and labels as a result. I see value in using the colour red for these particular filters because it will isolate all tasks that are overdue, regardless of project.
I very easily could have just created a filter named Overdue and then changed its colour to red, but the idea of using filters is to give you various views of your tasks that you’ll find valuable. Having a simple Overdue filter doesn’t help me out nearly as much as having filters that break down anything that is overdue by labels that I’m already using. In this case, the labels I use most are energy level ones. So it’s only natural I’d segment off anything that might be overdue into each of those labels. If you’re using more traditional contexts for labels (location-based ones, for example), then you may want to use “@home + od” or “@email + od” instead.
The use of colour can give you a visual trigger that draws your eye more effectively than a simple text-based title can.
5. Arrange your filters in some sort of order
Colour can be a great help in quickly noticing your filters, but placing them in an order that works best for your workflow is even more valuable.
Just like you can with projects in Todoist, you can sort your filters in whatever order you’d like (you can’t do this with labels). I’d recommend you sort them in order from most used to least used, but that also depends on what formulas you’re using for filters.
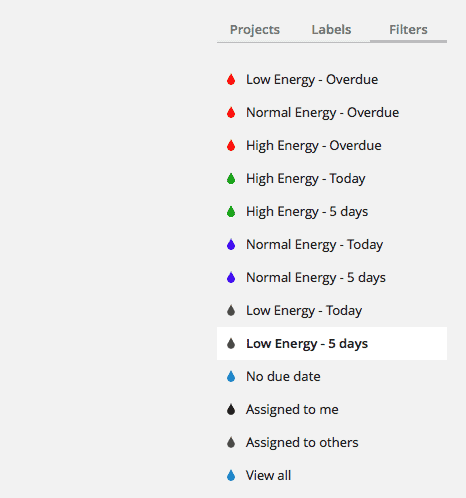
As you can see in my setup in the image above, all of the filters that contain the Overdue identifier are at the top, with the High, Normal, and Low Energy ones that are scheduled for today or over the next 5 days falling below them. That means that I’ll knock out the overdue tasks (if there are any) before I move on to any of the tasks that are due today or over the next work week. You’ll also notice that I place the lower energy overdue tasks at the very top. That’s so I can knock out any of the lowest energy overdue tasks first, working my way up to the higher energy ones as I go. Then I’ve listed the higher energy tasks that are not yet due above lower energy tasks. That’s so I review those tasks requiring higher levels of energy first, only moving on to lower energy tasks if I don’t feel that I have the reserves to work on high energy tasks at that time.
Whether you’ve been using Todoist for a long time or are just getting started, spend some time creating filters. Doing so will take some time, but using Todoist Filters will really help you take your productivity to the next level.
If you’re looking for more on what you can do with Todoist, check out my post on conducting a weekly review in Todoist and the piece where I discuss how you can really leverage Todoist’s Labels.